 ' or
sequences like '&cannot;' then please accept my
apologies.
' or
sequences like '&cannot;' then please accept my
apologies. This page provides practical guidance for students, staff and researchers at this University who need to wind their own inductors, transformers or solenoids. The types of wound components available, and their applications, are so varied that only general guidelines can be provided. A more complete appreciation of their capabilities (and limitations) is only gained through experience and experimentation.
Before deciding to produce a custom inductor consider whether you have an alternative. If you are designing a filter circuit, for example, then below about 100kHz it becomes attractive to use either op-amp circuits or switched capacitor ICs instead. If an inductor has to be used then look to see if it can be obtained as an 'off the shelf' part from one of the usual distributors.
Here is a procedure that you can follow to design an inductor. It may not be the most scientific way (it's somewhat 'trial and error') but it's easy to follow and understand -
If you find at step 5 that the core size selected in step 1 cannot accommodate the number of turns of the wire chosen then select a larger one and start again at 2.
About your browser: if this character '×' does not look like a multiplication
sign, or you see lots of question marks '?' or symbols like '' or
sequences like '&cannot;' then please accept my
apologies.
See also ...
[↑ TSU Advisor index]
[Using the TSU coil
winder] [ Air
coils] [A guide to the terminology
used in the science of magnetism] [A guide to unit
systems in electromagnetism] [ Power
loss in wound components] [The force
produced by a magnetic field] [
Faraday's law] [
Permanent magnets] [Bibliography]
[Acknowledgements]
The most important considerations in core selection are usually -
A very approximate guide might be -
| Min L | Max L | Type of Core | Adjus- table? |
High current? |
Frequency limit |
|---|---|---|---|---|---|
| 20 nano henry | 1 micro henry | Air cored, self supporting | Y | Y | 1GHz |
| 20 nano henry | 100 micro henry | Air cored, on former | N | Y | 500MHz |
| 100 nano henry | 1 milli henry | 'Slug' tuned open winding | Y | N | 500MHz |
| 10 micro henry | 20 milli henry | Ferrite ring | N | N | 500MHz |
| 20 micro henry | 0.3 henry | RM Ferrite Core | Y | N | 1MHz |
| 50 micro henry | 1 henry | EC or ETD Ferrite Core | N | Y | 1MHz |
| 1 henry | 50 henry | Iron | N | Y | 10kHz |
Ring cores (AKA 'toroids') are compact, inexpensive and useful when relatively few turns are needed. Without special apparatus they are rather tedious to wind and the current handling is limited because no air gap is possible. For these reasons they are mainly used above 100 kHz.
Rings may be supplied with a coating of polyamide, polyurethane or other insulation. This helps to reduce self-capacitance by keeping the turns away from the ferrite (some grades have relative permittivities approaching 106).
Rings made from iron dust are also available. These can have saturation points of 1T or more but permeabilities of 30 or less are common for dust cores. Some grades will perform well into the VHF region. Magnetic field leakage is low.
RM cores are a popular choice at frequencies up to 1MHz and currents up to 1A. The formers are supplied with up to 8 pins which bring connections to or from the coil(s) and which may easily be incorporated into a layout. The bobbin material is brittle and care must be taken not to bend the pins. The clips holding the core at the sides are rather crude and it's easy to chip the ferrite when removing them. For these reasons they are not ideal for prototype work.
Two basic types of RM cores are available: gapped and ungapped. Ungapped cores suitable for power applications are available with a different grade of ferrite which has a lower permeability but a higher value of saturation flux.
The size designations, RM6, RM7, RM10 etc. indicate that adjacent cores require a minimum spacing of 0.6, 0.7 or 1.0 inches on the PCB.
EC and ETD cores are intended for high power applications such as switch mode power supplies and DC to DC converters. For experimental work I recommend the ETD29 core in preference to the RM core because it has more space and the pins are more numerous and robust. Transfer your design to the RM if you decide that a smaller 'footprint' is needed.
If using an ungapped EC core you can place thin pieces of plastic between each half to obtain a gap which can be made precisely the right width.
There are currently three types of slug tuned coil assemblies in use in the School. These have 6 PCB pins and are suitable for low power IF transformers, filters and tuned circuits. They are most suitable when the inductance required must be adjustable. See separate description of these cores.
[↑ Top of page]
Iron is the oldest magnetic core material. Its advantages include a high saturation flux (2.1T) and a high relative permeability (7000). It is no longer used for transformers in its pure form for two reasons.
Firstly, iron has high remnance (1.3 T) and coercivity (80 A m-1). This results in hysteresis power loss. The remedy is to include a small amount (about 3%) of silicon. This reduces the loss by at least a factor of 10.
Secondly, iron will conduct current. This is bad in a transformer core because eddy currents lead to further power loss. As a result transformers with iron cores are limited to audio frequencies or below. Even then, the iron is used in stacks of thin sheets (laminations).
[↑ Top of page]
Decide the number of turns to wind on according to what you want to achieve: a known inductance, winding current or winding voltage waveform ...
For high permeability core inductors this is simple if you know the value of inductance required and the quoted Al value of the core.
Example: We need to make an inductor using the standard example
toroid core. How many turns do we need for 82 μH?
If the coil is air
cored then you will need to re-arrange one of the traditional formulae for
calculating the inductance
of such coils from the dimensions and the number of turns.
A common strategy is to work the core at close to its saturation flux level.
Example: We need to make an inductor capable of carrying 1.3
amps using the standard example
toroid. How many turns can be used?
In other words, we cannot put on more than two turns without
hitting saturation! This gives us just 8.8 μH.
The maximum total core flux is given by:
By re-arranging Faraday's
law,
where E is the externally applied voltage.
Example: We need to make a transformer for a switching supply using the standard example toroid. The supply to the primary is 12 volts and the maximum 'on time' for the switch is 10 micro seconds. How many turns must we use?
Here we must round up to 18 turns. With the current
driven winding the flux increased with the number of turns but with a voltage
driven winding the flux goes down with the number of turns. Honest.
Please address any complaints on this issue tomailto:m.faraday@ri.ac.uk.
[↑ Top of page]
In almost all cases this will be single strand 'enamel' insulated, also known as magnet wire. The coating is usually of poly vinyl acetal, polyester or polyurethane. The last of these is self-fluxing during soldering. It is manufactured to tightly controlled specifications laid down in standards such as BS 4520 and NEMA MW*. It can stand temperatures up to 120 centigrade or more for long periods.
There are some possible exceptions to this choice -
The next step is to calculate the thickness of wire required.
For self supporting coils this is usually decided on mechanical grounds; the larger the diameter of the coil the larger the diameter of wire used. A coil of 6 millimetre internal diameter might use 0.5 millimetre wire. Increase this pro rata if the coil takes heavy current.
For normal coils the diameter is chosen so that temperature rise and efficiency are both acceptable. Modern insulation materials are able to withstand temperatures so high that designing for tmax alone is probably not sensible. See the section on copper losses for more details.
You are encouraged to bring your own supplies of wire if using the Workshop winding machines but if the quantity you require is small (<20g) then ask a member of Workshop staff.
Always handle reels of thin enamel wire by the ends. When such wire is used in equipment at high temperature or high voltage for long periods of time then the acids present in fingerprints can lead to insulation failure.
After using a reel please anchor the ends of the wire to the bobbin either using tape or by a hole or slot cut in the flange. Never simply tuck one turn under another; the next user won't realise what has happened and will attempt to unwind the free end - until the reel jams, usually leaving it a write-off.
[↑ Top of page]
Coil formers, which are made of an insulating material, are bobbins onto which wire may be wound so that each turn is of the correct diameter and is held in place around whatever core material (if any) is used.
If you need many turns (>20) and wish to use one of the coil winders in the workshop then you must use a coil former.
[↑ Top of page]
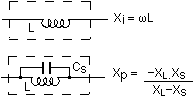 Self resonance is the term used to
describe the way in which the electrical characteristics of wound inductors
deviate at high frequencies from that of an ideal inductor. The reactance of an
ideal inductor increases linearly with frequency.
Self resonance is the term used to
describe the way in which the electrical characteristics of wound inductors
deviate at high frequencies from that of an ideal inductor. The reactance of an
ideal inductor increases linearly with frequency.
The practical inductor model includes a capacitor in parallel with the ideal inductor in order to represent stray capacitance between each turn and the turn next to it. There will also be distributed capacitance to any core that is used, and an exact model is too difficult to derive.
The consequence of this stray capacitance is that at some point (called the self resonant frequency) the impedance of the inductor will reach a peak. At higher frequencies the stray capacitance will become dominant and the impedance will begin to drop.
If you are deliberately using the inductor as part of a resonant circuit then it is important to note that the Q factor of a self resonant circuit is generally not high. Better values of Q can be obtained by choosing a smaller value of L and adding external capacitance to tune it. This behaviour is the reverse of that predicted by the simple formula for Q.
One method of minimizing self capacitance is to use 'wave wound' coils.
[↑ Top of page]
Once the thickness of wire and the number of turns has been decided, a check
should be made that sufficient space exists on the coil former. It is
sometimes imagined that turns can be packed in thus - 
This is impossible because if the first layer is wound from the left hand side of the coil former to the right hand side and has a normal 'right handed thread' (like a screw) then the second layer will have a 'left handed thread' as it moves back from the right side to the left. Since the turns on adjacent layers do not lie precisely parallel to one another, and must cross over at some point, they cannot always sit in the arrangement shown above. That said, the 'hop over' stretches may be quite short and much of the turn may still be in close contact with the turns below.
In practice you should allow for each layer to be separated by the whole thickness of the wire from the one underneath. The value of thickness used should be taken about 10% greater than the actual thickness to allow for irregularities. This applies only where the wire is fed on taking care that one turn is in close contact with the next. When thin wire (<0.2 millimetres) is used then this becomes impractical. About 15% should be added to the real diameter in the case of 'random wound' coils.
The wire sizes quoted in catalogues always refer to the diameter of the conductor. The enamel insulation increases this by about 10%.
Example -

  Core type RM7,  conductor diameter 0.56 millimetres


  From data sheet -
    Length of winding space = 7 millimetres
    Height of winding space = 3.1 millimetres

  Nominal diameter including insulation = 0.56 × 1.10 = 0.62
  Working diameter of wire = 0.62 × 1.10 = 0.68 millimetres

  Turns per layer = 7 / 0.68 = 10
  Maximum number of layers = 3.1 / 0.68 = 4

  Total = 10 × 4 = 40 turns.
This method produces conservative estimates which allow for any lead-out wires and extra insulation that may be needed.
Usually it is only possible to keep close packing going for about 4 or 5 layers without the 'cross over' effect mentioned spoiling the winding. By placing a layer of polyester or masking tape round the coil after every 2 or 3 layers to 'stabilise' the winding then close packing can be continued indefinitely.
[↑ Top of page]
Not all companies are prepared to deal in the small quantities that an experimenter usually requires. Try to reward those that are with a sensibly sized order.
Wire. Synthetic enamel insulated wire between 0.2 millimetres and 1.5 mm diameter comes from RS Components Ltd.. A range of iron and ferrite transformer kits is available as well as tapes and adhesives suitable for use on windings.
Other sizes of wire and also Litz try Comax.
Litz specialist litz-wire.com.
Here is a small selection of external links which may be of use to you. A few of these companies have indicated that they may be able to supply this University with sample products †.
[↑ Top of page]
There are two basic types of enamel wire insulation. You will need to remove it at the ends to make electrical connection.
1) Conventional enamel. This is usually dark brown in colour. In a production environment it is removed by a special rotary stripping machine. For prototype construction thick (>0.2mm) wire is best stripped with a scalpel blade. Rest the wire on a firm, flat surface and scrape the blade along at right angles to the wire.
Thinner wire is best stripped with fine sandpaper or emery cloth, although this is very slow. The process can be speeded up by first burning the enamel using a fine gas jet. This will leave a carbonized residue but this is much easier to sand away.
2) Self-fluxing enamel. This is usually pink or straw coloured. If you have a solder pot then simply dip the end of the wire in for a few seconds. The enamel will melt readily leaving you with a ready tinned end.
You can also remove the insulation if you have a soldering iron hot enough to melt it - about 400 centigrade. Most thermostatically controlled irons can be adjusted to run at this temperature. The joint will have been made correctly after the insulation is seen to 'bubble' for a second or two. When this happens the fumes emitted contain a small quantity of toluene di-isocyanate gas which is toxic and irritant.
If bubbling does not happen then the iron is not at the right temperature. Provided the soldering temperature is adequate, 'dry' joints are very rare.
[↑ Top of page]
Any of the digital readout inductance bridges should give a reasonably good idea of the inductance of your coil. More precise tests can be made with the HP bridge in the final year lab. This can test over a range of frequencies, and can also determine the Q factor.
If you don't get the right inductance then remember that this is related to the square of the number of turns. If your inductance is 20% too low then you must increase the turns by just under 10%.
If you are building a power transformer then bear in mind the non-linearity of permeability.
[↑ Top of page]
The principles involved in designing a simple wound component have changed little in the last 100 years; so older publications may contain useful, or perhaps just more comprehensible, information. Most of these publications are out of print but are included here as sources of reference.
Few of the vast number of works covering electromagnetism are without value, but a topic described intelligibly in one may be totally opaque in another.
[↑ Top of page]
Thanks are due to the following for their kind assistance on the subject wound components:
[↑ Top of page]
E-mail:R.Clarke@surrey.ac.uk
Last modified:
2008 August 2nd.